I’ve spend some time building my own Linux distro using Yocto, and now I’ve come to the point where I want to update my devices remotely. For this purpose there are a few solutions available such as swupdate, Mender, RAUC, os-tree etc.
My choice went out to swupdate since it’s more of a framework rather than supplying an end-to-end solution (like Mender). It should allow us to do our own stuff more easily while still relying on some of the implementations that are already inside the framework. Aside of that, os-tree also looks very promising on paper but is to far fetched from my current solution and will probable require a bigger overhaul. Enter swupdate.
Swupdate and Yocto
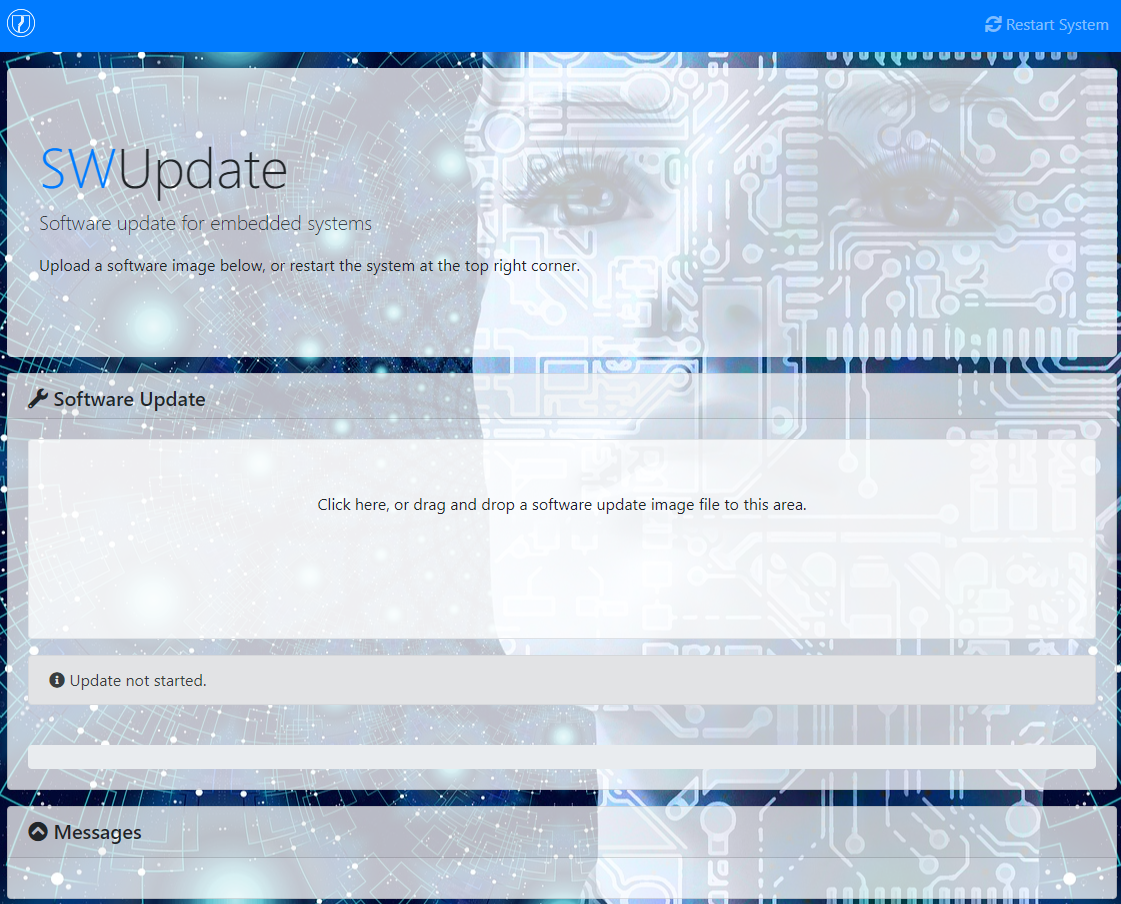
Adding swupdate to your Yocto build is as easily as downloading meta-swupdate sources and adding the meta layer to your bblayers.conf. Well that’s the theory… Although the docs claim that you should be fine using u-boot 16.05, and mine was 17.03, bitbaking failed because of some missing function calls that are needed to write to the u-boot environment. For that functionality Swupdate relies on u-boot-fw-utils. More recently they also started offering an alternative called libubootenv. The problem with libubootenv is that it was not yet introduced in the Yocto Rocko (2.4) branch that I’m on. Only the more recently branches of meta-swupdate contain a recipe for using libubootenv as alternative to u-boot-fw-utils. I tried the Zeus (3.0) branch, made sure to set the PREFERRED_PROVIDER to libubootenv , and made sure that all temporary build files from the u-boot-fw-utils recipe are deleted (important!). Now everything was bitbaking fine. After creating a new image I booted my target device and at least swupdate was working, plus it was also hosting its “Mongoose” update website on port 8080.
I also found little issues creating a valid cpio archive that contains the update manifest and artifacts. For example I could make sure that the updater checks the board’s hardware compatibility, and deploys the rootfs to my partition of choice. After having experimented a few things I found that Swupdate does fine in parsing the update manifest, fetching artifacts, and deploying the stuff that we want. But other questions arise: how can we have a rollback mechanism when things go wrong? And can we do a rollback automatically for our devices in the field? How can we reduce the downtime during the upgrade? Because what we want to avoid are scenarios such as with the Windows Update system which takes an endless amount of time during reboot to perform its tasks, rendering the device useless endlessly.
Dual rootsfs with rollback in u-boot
What we want is something as following… One rootfs partition (A) is active and executing, the other one (B) is used for the update. When a new updates arrives it goes into B, while rootfs in A is active. After reboot B becomes the active rootfs and A can be used for updates. If anything goes wrong during the update to B, we should still be able to load A because it was working fine for us previously. E voila, we got ourselves a dual rootfs with rollback mechanism.
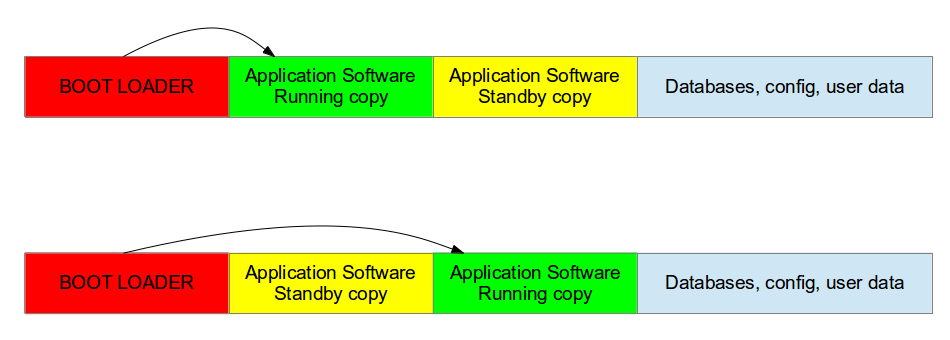
For our embedded device the bootloader assures which rootfs (A or B) is loaded. The u-boot bootloader relies on environment variables to select which partition contains the rootfs of our Linux system. The rootfs partition is passed into the kernel as kernel argument. Swupdate has support for updating such u-boot environment variables from linux userspace, though it doesn’t offer a fully working dual rootfs with rollback mechanism by itself. The swupdate docs introduce a high level overview on how you could implement this yourself. But for anything bootloader related they refer to the u-boot docs. Before we dive into that, what you should do is making sure you have partitioned your device to include 2 root filesystems. I created following partitions on my target device:
- /dev/mmcblk2 (emmc device, 16Gb)
- /dev/mmcblk2p1: boot (fat32, 32Mb)
- /dev/mmcblk2p2: rootfs1 (ext4, 2Gb)
- /dev/mmcblk2p3: rootfs2 (ext4, 2Gb)
- /dev/mmcblk2p4: data (ext4, 10Gb)
Next up is adding support in u-boot for changing the active rootfs partition. The bootcmd is executed by u-boot when going from bootloader stage to init kernel stage. U-boot also tells us on which device the kernel can find the rootfs. It’s passed as kernel argument using the bootargs variable. For example it could say:
bootargs root=/dev/mmcblk2p2 rdinit=/bin/kinit rw single
Editing this variables will make sure that the kernel looks for the rootfs in some other place. For example, when we use below modification the rootfs will be loaded from the third partition instead if the second:
bootargs root=/dev/mmcblk2p3 rdinit=/bin/kinit rw single
In this case it easier to store the rootfs partititon as a variable by itself so that when we update the bootargs we don’t discard any other modifications to it:
rootfspart 3

bootargs root=/dev/mmcblk2p${rootfspart} rdinit=/bin/kinit rw single
We can either alter the variable inside u-boot using the setenv command, or from Linux userspace using the fw_setenv tool provided by libubootenv (a binary compatible u-boot-fw-utils alternative). Swupdate will need to set the correct rootfs partition using fw_setenv after it has successfully deployed a rootfs update. Upon next boot, u-boot will pickup the updated variable and switch to the new rootfs.
However, when things go wrong and we’re unable to enter linux userspace using that new rootfs we want some system to detect these kind of errors. U-boot comes with bootcount and bootlimit support, but in many cases you still need to enable it before you can start using it. You need to add the support at compile time, in your u-boot source code you need to search the header file that adds support for your board. It’s found under the include/configs directory. Add:
#define CONFIG_BOOTCOUNT_LIMIT

#define CONFIG_BOOTCOUNT_ENV
CONFIG_BOOTCOUNT_LIMIT will add support for a bootcount variable. CONFIG_BOOTCOUNT_ENV makes sure that the bootcount variable is stored in the u-boot uenv so that after reboot tits value is not discarded. Each time the system is reset (not power cycled!) the bootcount variable increments and its updated value stored in the uenv. We can compare the bootcount to a bootlimit variable and use that to swap rootfs partitions. The actual comparison is already being taken care of in u-boot, you only need to setup the bootlimit variable (for example: setenv bootlimit 5) otherwise the bootcounter will be ignored by u-boot. If the bootlimit is reached, u-boot will run the altbootcmd instead of the usual bootcmd. Altbootcmd is by default not defined in u-boot, that you also have to do yourself. One use case is that altbootcmd can make sure that the rootfspart variable that I’ve introduced earlier is being swapped between 2 and 3, and next call the normal boot command (bootcmd). Another thing you need to take care of is that Linux userspace will also need to reset the persistently stored bootcount variable at each boot in order to prevent the bootlimit from being reached when our system is doing fine.
One more thing about the bootcount variable. The variable is write protected by another variable called upgrade_available. The latter, when not set, will prevent u-boot from actually writing the incremented bootcount variable to the u-boot environment. Hence, bootcount won’t increment as long as upgrade_available is unset. It’s introduced to prevent writing to the uenv at each boot thus lowering the wearing and reducing any issues that could occur due to power loss while writing. In linux userspace you should also check the upgrade_available variable first before resetting the bootcount.
In the end… what swupdate needs to do after it has deployed its artifacts is making sure that the upgrade_available variable is set which will enable the bootcounter upon next reboot. If all goes well the new rootfs will boot into linux and some script will unset the upgrade-available variable and reset the bootcount. However if things go wrong the bootcount will be increased and the system will reset until the bootlimit is reached. Now we will rollback into the working rootfs where we started the upgrade from. That same script will verify all is ok and unset the upgrade-available variable and reset the bootcount. The device should also notify to the end customer that the update failed. At next boot the device will keep booting into the “old” and stable rootfs. The user will have to reapply a new update after verifying why the previous update failed.
For all of this this to work we need to edit the CONFIG_EXTRA_ENV_SETTINGS statement in the u-boot sources. Its found in the same file where you set the CONFIG_BOOTCOUNT_LIMIT. Add following lines:
"bootlimit=5\0" \

"rootfspart=2\0" \

"bootargs=root=/dev/mmcblk2p${rootfspart} rdinit=/bin/kinit rw single\0" \

"altbootcmd=" \

"  echo Rollback to previous RootFs; "

"  if test ${rootfspart} = 2; " \

"    then setenv rootfspart 3; " \

"  else " \

"     setenv rootfspart 2; " \

"  fi; setenv bootcount 0; saveenv; " \

"  bootcmd\0" \
The modifications set the bootlimit to 5, and set the default routfs partition to 2. The altbootcmd makes sure we can switch partitions during rollback and the modified bootargs assures that the rootfs partition is loaded from an uenv variable.
Rollback in action
With that integrated in our bootloader we can start testing the rollback feature. Update your sdcard/emmc image and run it with your device. It should boot as always using the bootcmd variable, and load the rootfs in partition 2. At this stage, partition 3 is still empty. Once you’re in linux, check the uenv using fw_printenv. You should see the newly added bootcount and such vars. If it’s not the case, make sure to reset u-boot to its default variable values. Next we’re going to enable the bootcounter, so execute:
$ fw_setenv upgrade_available 1
Note that we haven’t implemented any script yet that resets the upgrade_available and bootcount variables. So by sending a reboot command we will see the bootcounter incrementing much alike in situations where a watchdog would kick in whenever loading the rootfs hangs. Now reboot the system from u-boot all the way up to linux and back using the reboot command, and repeat until the bootlimit is reached. At this point you’ll see some extra debug lines during the bootloader stage explaining that the altbootcmd is used:
Warning: Bootlimit (3) exceeded. Using altbootcmd.
Hit any key to stop autoboot: 0
Saving Environment to MMC...
Writing to MMC(0)... done
WARN: rollback RootFS to /dev/mmcblk2p3
Furthermore since partition 3 (/dev/mmcblk2p3) is still empty your linux should now also fail to boot due to missing rootfs. In the bootlog you’ll see a kernel panic:
Kernel panic - not syncing: VFS: Unable to mount root fs on unknown-block(179,10)
To overdue this you can easily go back into the u-boot shell and setting the rootfspart variable back to 2. Though, this is also a good moment to install a secundary rootfs in partition 3 to test if you can successfully start the updated rootfs. I’m not covering this, but I’m expecting you did that.
Preventing rollback in sunny-day scenarios
The next step is to make sure that, once your updated Linux os is up and running, you have a script executed that disables the bootcounter. It won’t go to much into detail here, but it could be as easily as having the underneath bash script executing through your init system of choice:
#!/bin/sh

# Always check if the upgrade_available var is set
# to reduce write cycles to the uenv.
ISUPGRADING=$(fw_printenv upgrade_available | awk -F'=' '{print $2}')
echo "upgrade_available=$ISUPGRADING"
if [ -z "$ISUPGRADING" ]
then
    echo "No RootFs update pending"
else
    echo "RootFs update pending, verifying system"
    # Perform extra checks here.
    # If anything went wrong, reboot again until the bootlimit is reached
    # which triggers a rollback of the RootFs
    fw_setenv upgrade_available
    fw_setenv bootcount 0
fi
You may have higher demands in verifying if the systems is running well such assuring that your application is running. Or maybe you want to assure that your internet connection is up, or that your device is able to notify the remote update server your os version and such. I leave that up to you…
Watching kernel panics
From what we noticed earlier, sometimes things go wrong and our rootfs fails to load, hence a kernel panic is triggered. For testing purposes you may also wipe one of your partitions: wipefs -a -t ext4 -f /dev/mmcblk2p3. It will trigger that same kernel panic we saw earlier. Unfortunately this will lock our device into a failed state and a manual reset will need to be performed. Sometimes that may be desirable, but in many cases you’ll want the show to go on. There are some ways to make the device autoreboot when such scenarios occur. Some may want to use a (external) watchdog to catch any errors from happening but I found that using the kernel’s panic reset system was a very easy way to get some sort of similar behavior. This kernel features makes sure that whenever a kernel panic occurs the system will be resetted. One way to set this up is feeding following kernel argument in u-boot:
panic=5
It will trigger a reset 5 seconds after a kernel panic occurred:
No filesystem could mount root, tried: ext3
ext2 ext4
vfat
Kernel panic - not syncing: VFS: Unable to mount root fs on unknown-block(179,10)
CPU0: stopping
CPU: 0 PID: 0 Comm: swapper/0 Not tainted 4.9.88-9512b3d443a53afbc8c7c18894249f78b62cc324+g9512b3d #1
...
Rebooting in 5 seconds..

U-Boot SPL 2017.03-c94efdc139f6a6c193aaf77f171a01d09686451c+gc94efdc (Jul 14 2020 - 09:46:33)
Integrating the u-boot environment in Swupdate
Then there also the swupdate manifest, or as they call it: the sw-description.
software =
{
    version = "2.3.0";

    mylinuxboard = {
        hardware-compatibility: [ "1.0" ];
        rootfs1: {
            images: (
                {
                    filename = "rootfs.ext4.gz";
                    compressed = "zlib";
                    installed-directly = true;
                    device = "/dev/mmcblk2p2";
                }
            );
            bootenv: (
                {
                    name = "rootfspart";
                    value = "2";
                },
                {
                    name = "upgrade_available";
                    value = "1";
                }
            );
            scripts: (
                {
                    filename = "resizeRootsfs.sh";
                    type = "postinstall";
                    data = "2"
                }
            );
        }
        rootfs2: {
            images: (
                {
                    filename = "rootfs.ext4.gz";
                    compressed = "zlib";
                    installed-directly = true;
                    device = "/dev/mmcblk2p3";
                }
            );
            bootenv: (
                {
                    name = "rootfspart";
                    value = "3";
                },
                {
                    name = "upgrade_available";
                    value = "1";
                }
            );
            scripts: (
                {
                    filename = "resizeRootsfs.sh";
                    type = "postinstall";
                    data = "3"
                }
            );
        }
    }
}
This describes the software infrastructure, and is a manifest used by swupdate to update parts of your system. In our case it defines that we have under our software collection stuff specially made for the “mylinuxboard” target which has revision “1.0”. It has 2 sub-collections that defines the updates for the rootfs’es on partition 2 and 3. The 2 sub-collections each contain an image part which handles the actually copying of the compressed rootfs into the target partition. And they also contain another part which describe the bootloader integration code to execute. On our case it defines the u-boot uenv code to update using the fw_setenv (more or less). So what we do here is not only making sure that the rootfs is deployed into the correct partition, we also enable the u-boot bootcounter (through upgrade_available) and set the target partition that we want to start using after reboot so that the newly updated rootfs is being used.
We can now create the update archive that contains the sw-desciption and all files that need to be deployed. From Yocto you can create a recipe to do that, but we can also do it from command line using following script:
#!/bin/bash

CONTAINER_VER="1.0.0"
PRODUCT_NAME="my-software"
FILES="sw-description \
    resizeRootsfs.sh \
    rootfs.ext4.gz \
"
for i in $FILES;do
    echo $i;done | cpio -ov -H crc > ${PRODUCT_NAME}_${CONTAINER_VER}.swu
We can now execute swupdate using the .swu archive we just created:
$ swupdate -v -f /etc/swupdate.cfg -e mylinuxboard,rootfs2 -i my-software_1.0.0.swu
Swupdate v2019.11.0
Licensed under GPLv2. See source distribution for detailed copyright notices.
Running on mylinuxboard Revision 1.0
Registered handlers:
dummy
uboot
bootloader
flash
lua
raw
rawfile
rawcopy
shellscript
preinstall
postinstall
software set: mylinuxboard mode: rootfs2
[TRACE] : SWUPDATE running : [network_initializer] : Main loop Daemon
[TRACE] : SWUPDATE running : [extract_sw_description] : Found file:
filename sw-description
size 2018
checksum 0x1b90d VERIFIED
[TRACE] : SWUPDATE running : [listener_create] : creating socket at /tmp/sockinstctrl
[TRACE] : SWUPDATE running : [listener_create] : creating socket at /tmp/swupdateprog
[TRACE] : SWUPDATE running : [get_common_fields] : Version 2.3.0
[TRACE] : SWUPDATE running : [parse_hw_compatibility] : Accepted Hw Revision : 1.0
[TRACE] : SWUPDATE running : [parse_images] : Found compressed Image: rootfs.ext4.gz in device : /dev/mmcblk2p3 for handler raw
[TRACE] : SWUPDATE running : [parse_bootloader] : Bootloader var: upgrade_available = 1
[TRACE] : SWUPDATE running : [parse_bootloader] : Bootloader var: rootfspart = 3
[TRACE] : SWUPDATE running : [check_hw_compatibility] : Hardware mylinuxboard Revision: 1.0
[TRACE] : SWUPDATE running : [check_hw_compatibility] : Hardware compatibility verified
[TRACE] : SWUPDATE running : [cpio_scan] : Found file:
filename resizeRootsfs.sh
size 568
REQUIRED
[TRACE] : SWUPDATE running : [cpio_scan] : Found file:
filename rootfs.ext4.gz
size 239585335
REQUIRED
[TRACE] : SWUPDATE running : [install_single_image] : Fo mmcblk2: p1 p2 p3 p4
und installer for stream rootfs.ext4.gz raw
-----------------------
| RESIZING ROOTFS |
-----------------------
Using /dev/mmcblk2p2
e2fsck 1.43.5 (04-Aug-2017)
Pass 1: Checking inodes, blocks, and sizes
Pass 2: Checking directory structure
Pass 3: Checking directory connectivity
Pass 4: Checking reference counts
Pass 5: Checking group summary information
/dev/mmcblk2p2: 43400/304160 files (0.1% non-contiguous), 240702/304128 blocks
resize2fs 1.43.5 (04-Aug-2017)
Resizing the filesystem on /dev/mmcblk2p2 to 524288 (4k) blocks.
The filesystem on /dev/mmcblk2p2 is now 524288 (4k) blocks long.

[TRACE] : SWUPDATE running : [execute_shell_script] : Calling shell script /tmp/scripts/resizeRootsfs.sh 2: return with 0
Software updated successfully
Please reboot the device to start the new software
[INFO ] : SWUPDATE successful !
mmcblk2: p1 p2 p3 p4
Making it more robust
The above solution is a great start for most projects. However if you want to make it robust and production proof there are some more things that you could do:
- Don’t store the u-boot bootcounter in the u-boot env. U-boot also supports storing in RAM, RTC, etc. It reduces write cycles but more importantly its a safer way of updating the bootcounter when a power loss occurs.
- Use a dual u-boot-environment. If you have only one, a power strike during updating the uenv could have catastrophic results.
- Have a dual boot partition. It will allow you to safely update your dtb and kernel in the same manner as the rootfs is updated.
- Sign your artifacts. It assures that the distributor of the updates can be trusted, so that we can take for granted the fact that our update server is our own server and not someone else his.
- Setup a watchdog that resets the device whenever boot issues occur, for example loading the rootfs not found.
- Secure your firmware storage server so that your firmwares can only be downloaded by your software and no one else