Few months after installing a ventilation unit that regulates the air quality inside the house I’m now at a point to review this “upgrade”. Personally I didn’t notice any effect on my breathing, getting less sick, getting less tired or anything else that could be related to breathing “clean” air. The only thing I did notice is that the ventilation unit produces quite a bit of noise: my house isn’t quiet anymore at night. I wanted to get to know a little bite more about its effects so I starting thinking of ways to measure the air quality.
The theory
As it seems the most important indicator for the indoor air quality is defined through the Carbon Dioxide (CO2) level. CO2 is a colourless gas that contains 2 oxygen atoms (double) bounded to one carbon atom. Although the molecule isn’t considered poisonous and may not look so different than the oxygen molecules (O2) that we need to breath in order to survive, it is however unhealthy to breathe-in high levels of CO2. Levels of 1% (10.000 parts per million – PPM) will make you feel drowsy, and at 7-10% you’ll start to suffocate, feel dizzy, notice a headache and you may also receive visual or hearing dysfunctions, all within few minutes until a few hours. As the NASA reports, even being exposed for an 8 hours period to levels of 5000 ppm could result in headaches, sleep disorder, emotional irritation and so forth. Nowadays it is generally accepted that values below 1000 ppm are considered ok to live in, but that you should ventilate as soon as that level is exceeded. For values above 1000 ppm ventilation is recommended.

Values below 450 ppm are considered very good since in many occasions this boils down to the outdoor CO2 level. Before the industrial revolution began that value was even lower! Given all of that we now have good idea what values to compare too. One more note: CO2 weighs roughly 50% more than dry air. In effect carbon dioxide is best measured lower to the ground. Don’t place your sensor against the ceiling!
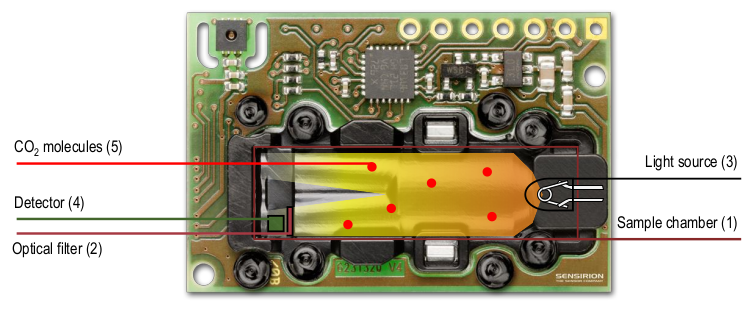
Next I started looking for sensors. Most often I found that the best quality sensors use the so called NDIR sensor technology. A NonDispersive InfraRed (NDIR) sensor is a small spectroscopic sensor. I agree if you find that to be a whole lot of complicated words. I won’t go too much into detail here, but the ways it works is as following. A infrared light source is used to send IR light through a sample chamber into an IR detector. Parallel with that a second beam of light is send through a reference chamber typically filled with nitrogen. Because gas composition influences the absorption of light and as the composition is different in both chambers, the IR detector will also pick up these differences. The reference chamber always contains the same composition and is therefore very suitable to check for changes in composition of the gas in the sample chamber. More detailed, each molecules is also known to absorb light which is only within a given part of the light’s spectrum. For example CO2 molecules absorb light the best when using light with wavelengths of around 2,7μm, 4,7μm or 13μm. Using specific LEDs (such as IR LEDs) and light filters these specific wavelengths can be obtained which allows the NDIR sensor to “sense” a specific molecule or set of molecules.

The Sensirion SCD30
During my hunt for sensors my news feeds caught up on me as I received a newsletter promoting the Sensirion SCD30. Diving into various open-source how-to’s I noticed how this sensor, while not cheap to buy, is often respected for offering decent C02 measurements. The Sensirion SCD30 uses the NDIR technology, is widely supported through various libraries, and on top also measures temperature and humidity (as a side effect of sensor-correction). The decision was made, my wallet shrunk a fair amount of money worth more than a few beers, however in replace I received this brand new sensor which will from now on report how healthy the indoor air really is.
Specifications:
- NDIR CO2 sensor technology
- Integrated temperature and humidity sensor
- Best performance-to-price ratio
- Dual-channel detection for superior stability
- Small form factor: 35 mm x 23 mm x 7 mm
- Measurement range: 400 ppm – 10.000 ppm
- Accuracy: ±(30 ppm + 3%)
- Current consumption: 19 mA @ 1 meas. per 2 s.
- Energy consumption: 120 mJ @ 1 measurement
- Fully calibrated and linearized
- Digital interface UART or I2C
From these specifications, notice how the SCD30 is specified for operation in the sub 10.000 ppm range, comes with an accuracy of roughly 30 ppm, and has temperature / humidity compensation on-board: perfect for in-door CO2 level monitoring.
Interfacing
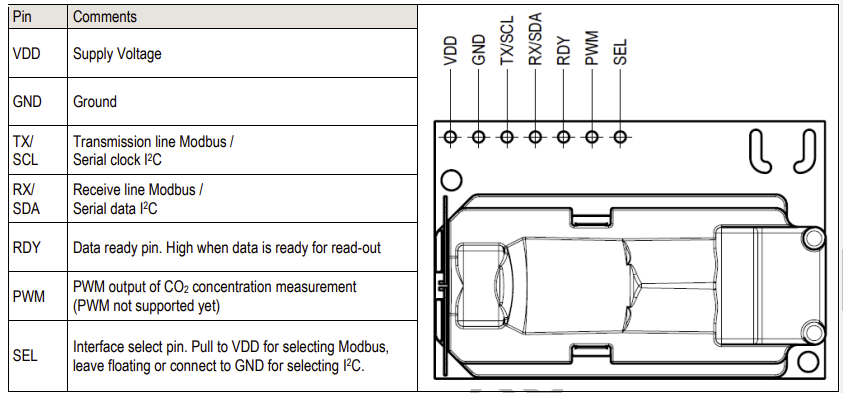
The SCD30 can be interfaced in few ways. You can either use I2C or UART (with Modbus protocol). These interface modus are handy to adjust configuration options such as the sensor sampling interval, temperature offset, self-calibration and many more. For those who like to operate it without any of these data interfaces can also interface through the for PWM mode. Once the SC30 has been configured using either I2C or Modbus you can get the sensor value by evaluating the signal on the PWM pin. The benefit here is that you need only one pin to interface the SCD30, the configuration can happen during manufacturing. The downside is that you’re less flexible in ways of using the sensor plus you’ll be limited in reading CO2 levels only.
Calibration
Due to how NDIR sensors work they’re delicate to use and subject to mechanical stress, shocks, heating and other environmental influences. This implies that sensor values may show serious deviations over time. Because of that the SC30 requires sensor calibration in order to keep the sensor value within the specs. Sensirion states that you can expect a typical annual drift of around +/-80ppm when no calibration is performed. There is no real recommendation when calibration should be performed because it depends on your required accuracy to determine re-calibration intervals. Because for indoor usage we’ll be mostly measuring in the range of 400-1000 ppm so having a deviation of 80 ppm annually I’d suggest for our case that calibration should at least happen twice a year.
There are 2 ways of calibrating the SCD30: Forced Re-Calibration (FRC) and Automatic Re-Calibration (ARC). During the forced and automatic calibration process the same reference value will be set. The reference value is used internally to adjust the calibration curve which restored the sensor accuracy. The way the sensor output value is manipulated and corrected is always the same, the way the reference value is set is however depending on the calibration method. Once the reference value is set it is also stored in non-volatile memory and will persist until a new reference value is set.
With Forced Re-Calibration (FRC) the user has to provide the reference value manually using the I2C or modbus interfaces. It is crucial to provide a good reference value. You can either use a second calibrated sensor, or expose the sensor to a CO2 controlled environment with stable and known CO2 level, or by exposing the sensor to fresh outside air (=400 ppm). Keep in mind that the supplied calibration value need to be between 400 and 2000 ppm and that the sensor must have been operated for at least 2 minutes in “continuous mode”. More on that mode later on.
With Automatic Re-Calibration (ARC) the sensor automatically generates the reference calibration value by monitoring and analyzing the CO2 levels it measures. The algorithm focuses on measuring lowest CO2 level multiple times, which it can then use for calibration. The upside is that the firmware doesn’t need to perform the calibration process, the downside is that the sensor has to regularly see CO2 levels of fresh outdoor air (=400 ppm). According to the datasheet this means that it needs to see “fresh air” for at least 1h a day. Inside buildings this can be achieved by well ventilating the room/building whenever humans are not present. It also implies that the sensor is operated in “continuous mode” all the time. Furthermore when using the sensor for the first time it needs roughly 7 days before reaching its calibration value. And note that the sensor has to be power continuously, which may have a big impact on battery life if that is your source of power.
Modus operandi
The Sensirion SCD30 can operate in “continuous operation“. In this mode the sensor will automatically poll itself at an user-defined interval. The interval can be set through the command interface, and the chip will raise its data-ready pin whenever data is ready to be read. In between sampling the chip’s power consumption is reduced so you may want to adjust the sampling rate according to your needs. This part is further discussed near the end of this article. The benefit with continuous mode is that it can optionally handle the calibration automatically through the ARC process. All together this makes that the SCD30, once setup, only requires from an outside chip to readout the data whenever it is available, which is very handy from a programmers point of view. That aside you’re also able to not rely on ARC and rather run forced re-calibration manually, while the sensor is still collecting data in continuous mode. After power cycling the sensor it will automatically resume to operate in continuous mode if that is how it has been setup. Keep in mind that continuous mode requires 1-2 minutes to stabilize the readings.
If you want you can also stop the continuous operation. The documentation isn’t exactly clear on how this mode is referred too and how the sensor behaves. Through Sensirion Support I came to understand that when continuous operation is stopped the sensor’s value is not expected to be updated anymore. You’d need to start continuous mode again for capturing new sensor values. Unfortunately stopping continuous mode doesn’t deactivate the detectors so it will not reduce the power usage. All together this makes that there is little reason to deactivate the continuous operation and that also why Sensirion is advising against it.
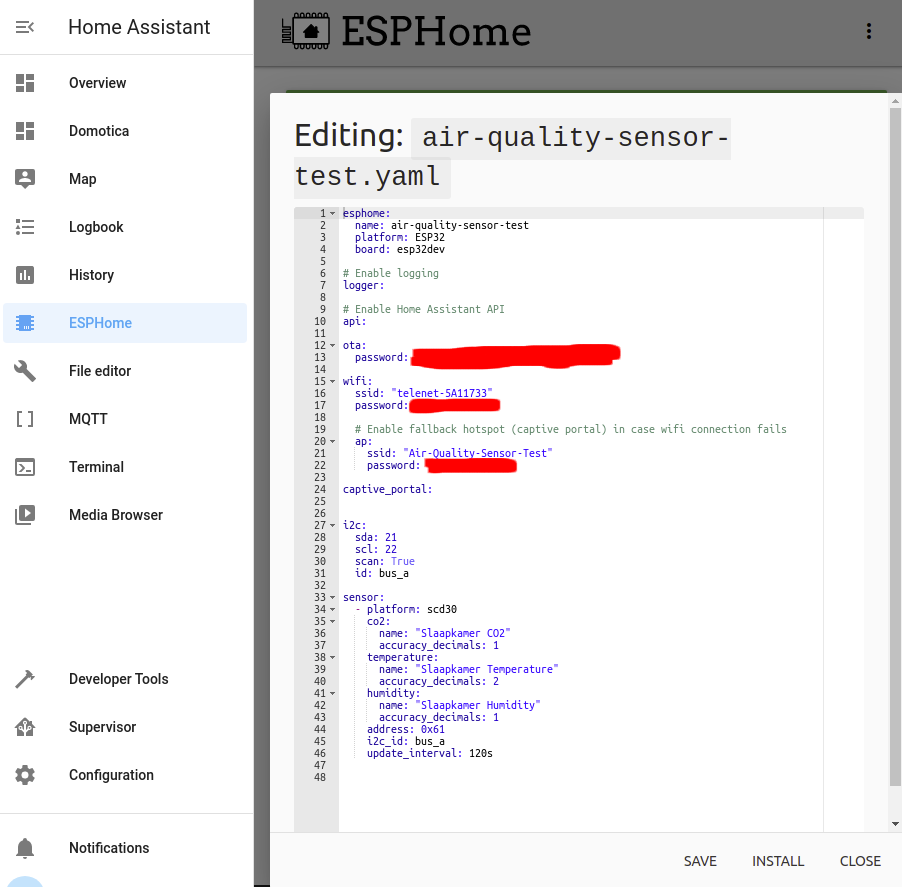
Integrating the sensor into Home Assistant using the ESP32 and ESPHome
I don’t think Home Assistant needs any introduction here, it’s a very popular option for building your own free open-source domotics and automations system. The ESP32 is very well known too, its powerful dual-core processor and integrated Wifi chip allows for easy interfacing within your home network. ESPHome is software that exists of 2 things: a firmware that covers all sorts of sensors and that you can integrate using a simple yaml file without needing to write any line of code, and a Home Assistant addon that let’s you manager your ESP32 wifi nodes and their configuration. What makes ESPHome so handy is that it can already handle our SCD30 sensor, therefore only minor configuration needs to be performed of the firmware settings. Once the firmware is deployed, the sensor will automatically become available in Home Assistant.
By default the sensor samples each 60 seconds. The sample rate can easily be adjusted using the update_interval setting. The SCD30 is by default also running in continuous mode and performing ARC (auto-calibration). For description of all sensor configurations look here.
Here is how I’ve configured the ESPHome firmware for building the wireless CO2 sensor:
esphome:
  name: air-quality-sensor-test
  platform: ESP32
  board: esp32dev

# Enable logging
logger:

# Enable Home Assistant API
api:

ota:
  password: "*******************************"

wifi:
  ssid: "telenet-5A11733"
  password: "********"

  # Enable fallback hotspot (captive portal) in case wifi connection fails
  ap:
    ssid: "Air-Quality-Sensor-Test"
    password: "********"

captive_portal:


i2c:
  sda: 21
  scl: 22
  scan: True
  id: bus_a

sensor:
  - platform: scd30
    co2:
      name: "Slaapkamer CO2"
      accuracy_decimals: 1
    temperature:
      name: "Slaapkamer Temperature"
      accuracy_decimals: 2
    humidity:
      name: "Slaapkamer Humidity"
      accuracy_decimals: 1
    address: 0x61
    i2c_id: bus_a
    update_interval: 120s
The first time you flash the ESP32 you need to do that using the ESPHome-Flasher utility and a UART to USB converter. See below for a screenshot of the utility in action.

Afterwards the ESPHome firmware and Home Assitant integration is able to perform firmware updates automatically. Note that firmware re-configuration, for example to adjust the sampling rate, actually requires to recompile the firmware and redeploy it into the ESP32. That’s where the HA addon for ESPHome comes in handy. It performs these steps automatically for you, all you need to do is adjust the yaml configuration and hit “save” and “install“.
Wiring the sensor is not complicated at all and takes only 4 wires as you can see below. For a pinout of the ESP32 DevKit I’m using I’d suggest visiting the circuits4you webpage.

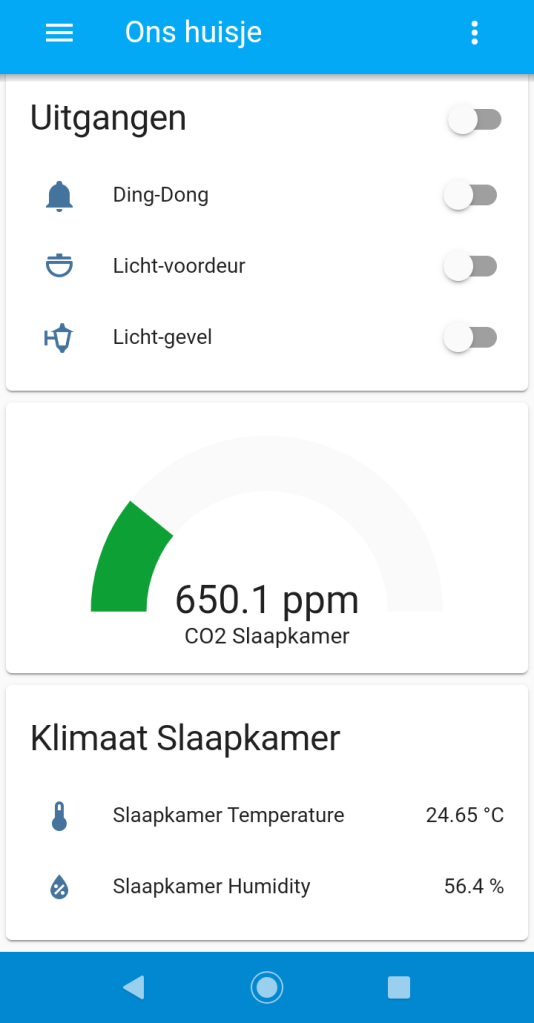
Now powerup the ESP32 and SCD30 sensor. The device should report new sensor values automatically in Home Assistant. Here is a capture of the sensor in HomeAssistant:

Making it truly wireless
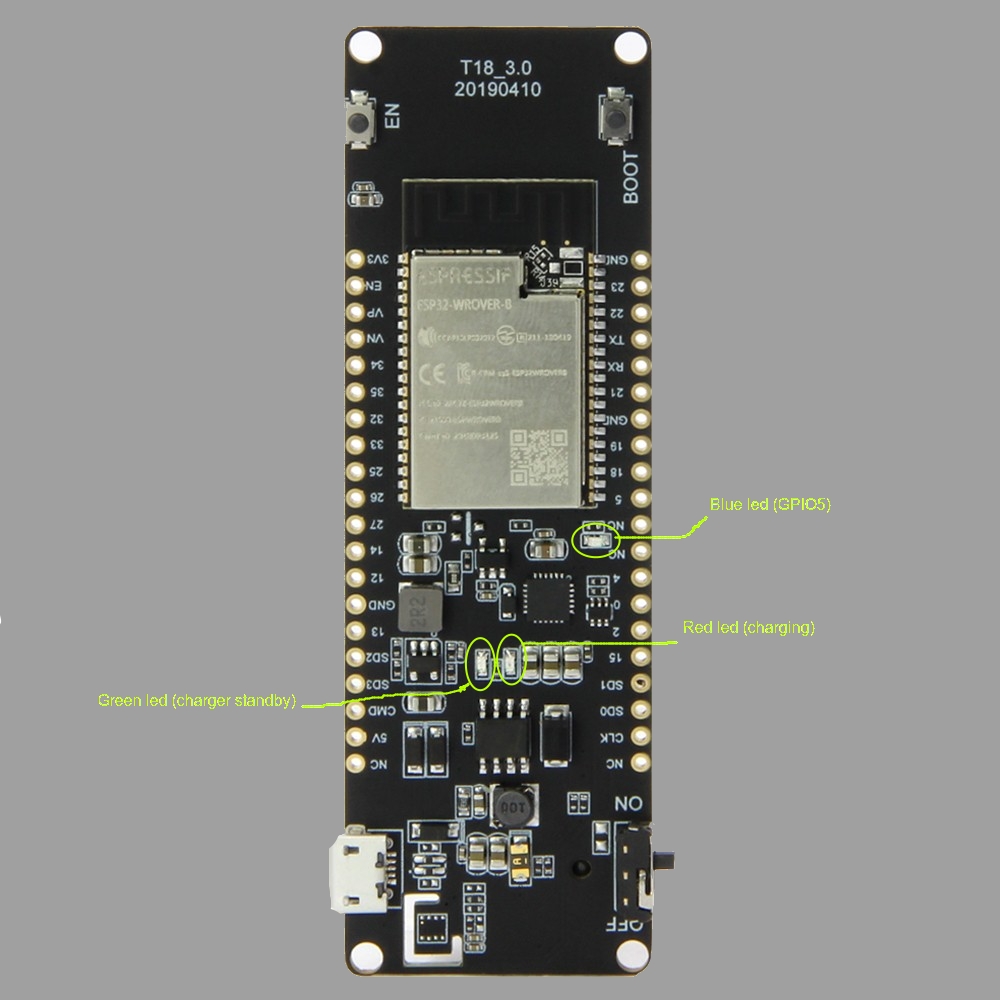
While we’re already achieved our goal, the one thing that is still limiting us from having a truly wireless solution is that we need to keep it powered all the time using a 5V cellphone charger. This got me wondering how the performance would be when running it from batteries. I noticed the LilyGO T-Energy module combines the ESP32 with a socket and charging circuitry for 18650 lithium batteries. This board is an excellent candidate for any ESPHome battery powered sensor since it provides all the components you need for battery operation: you only need to hook up the sensor and setup ESPHome to handle it.
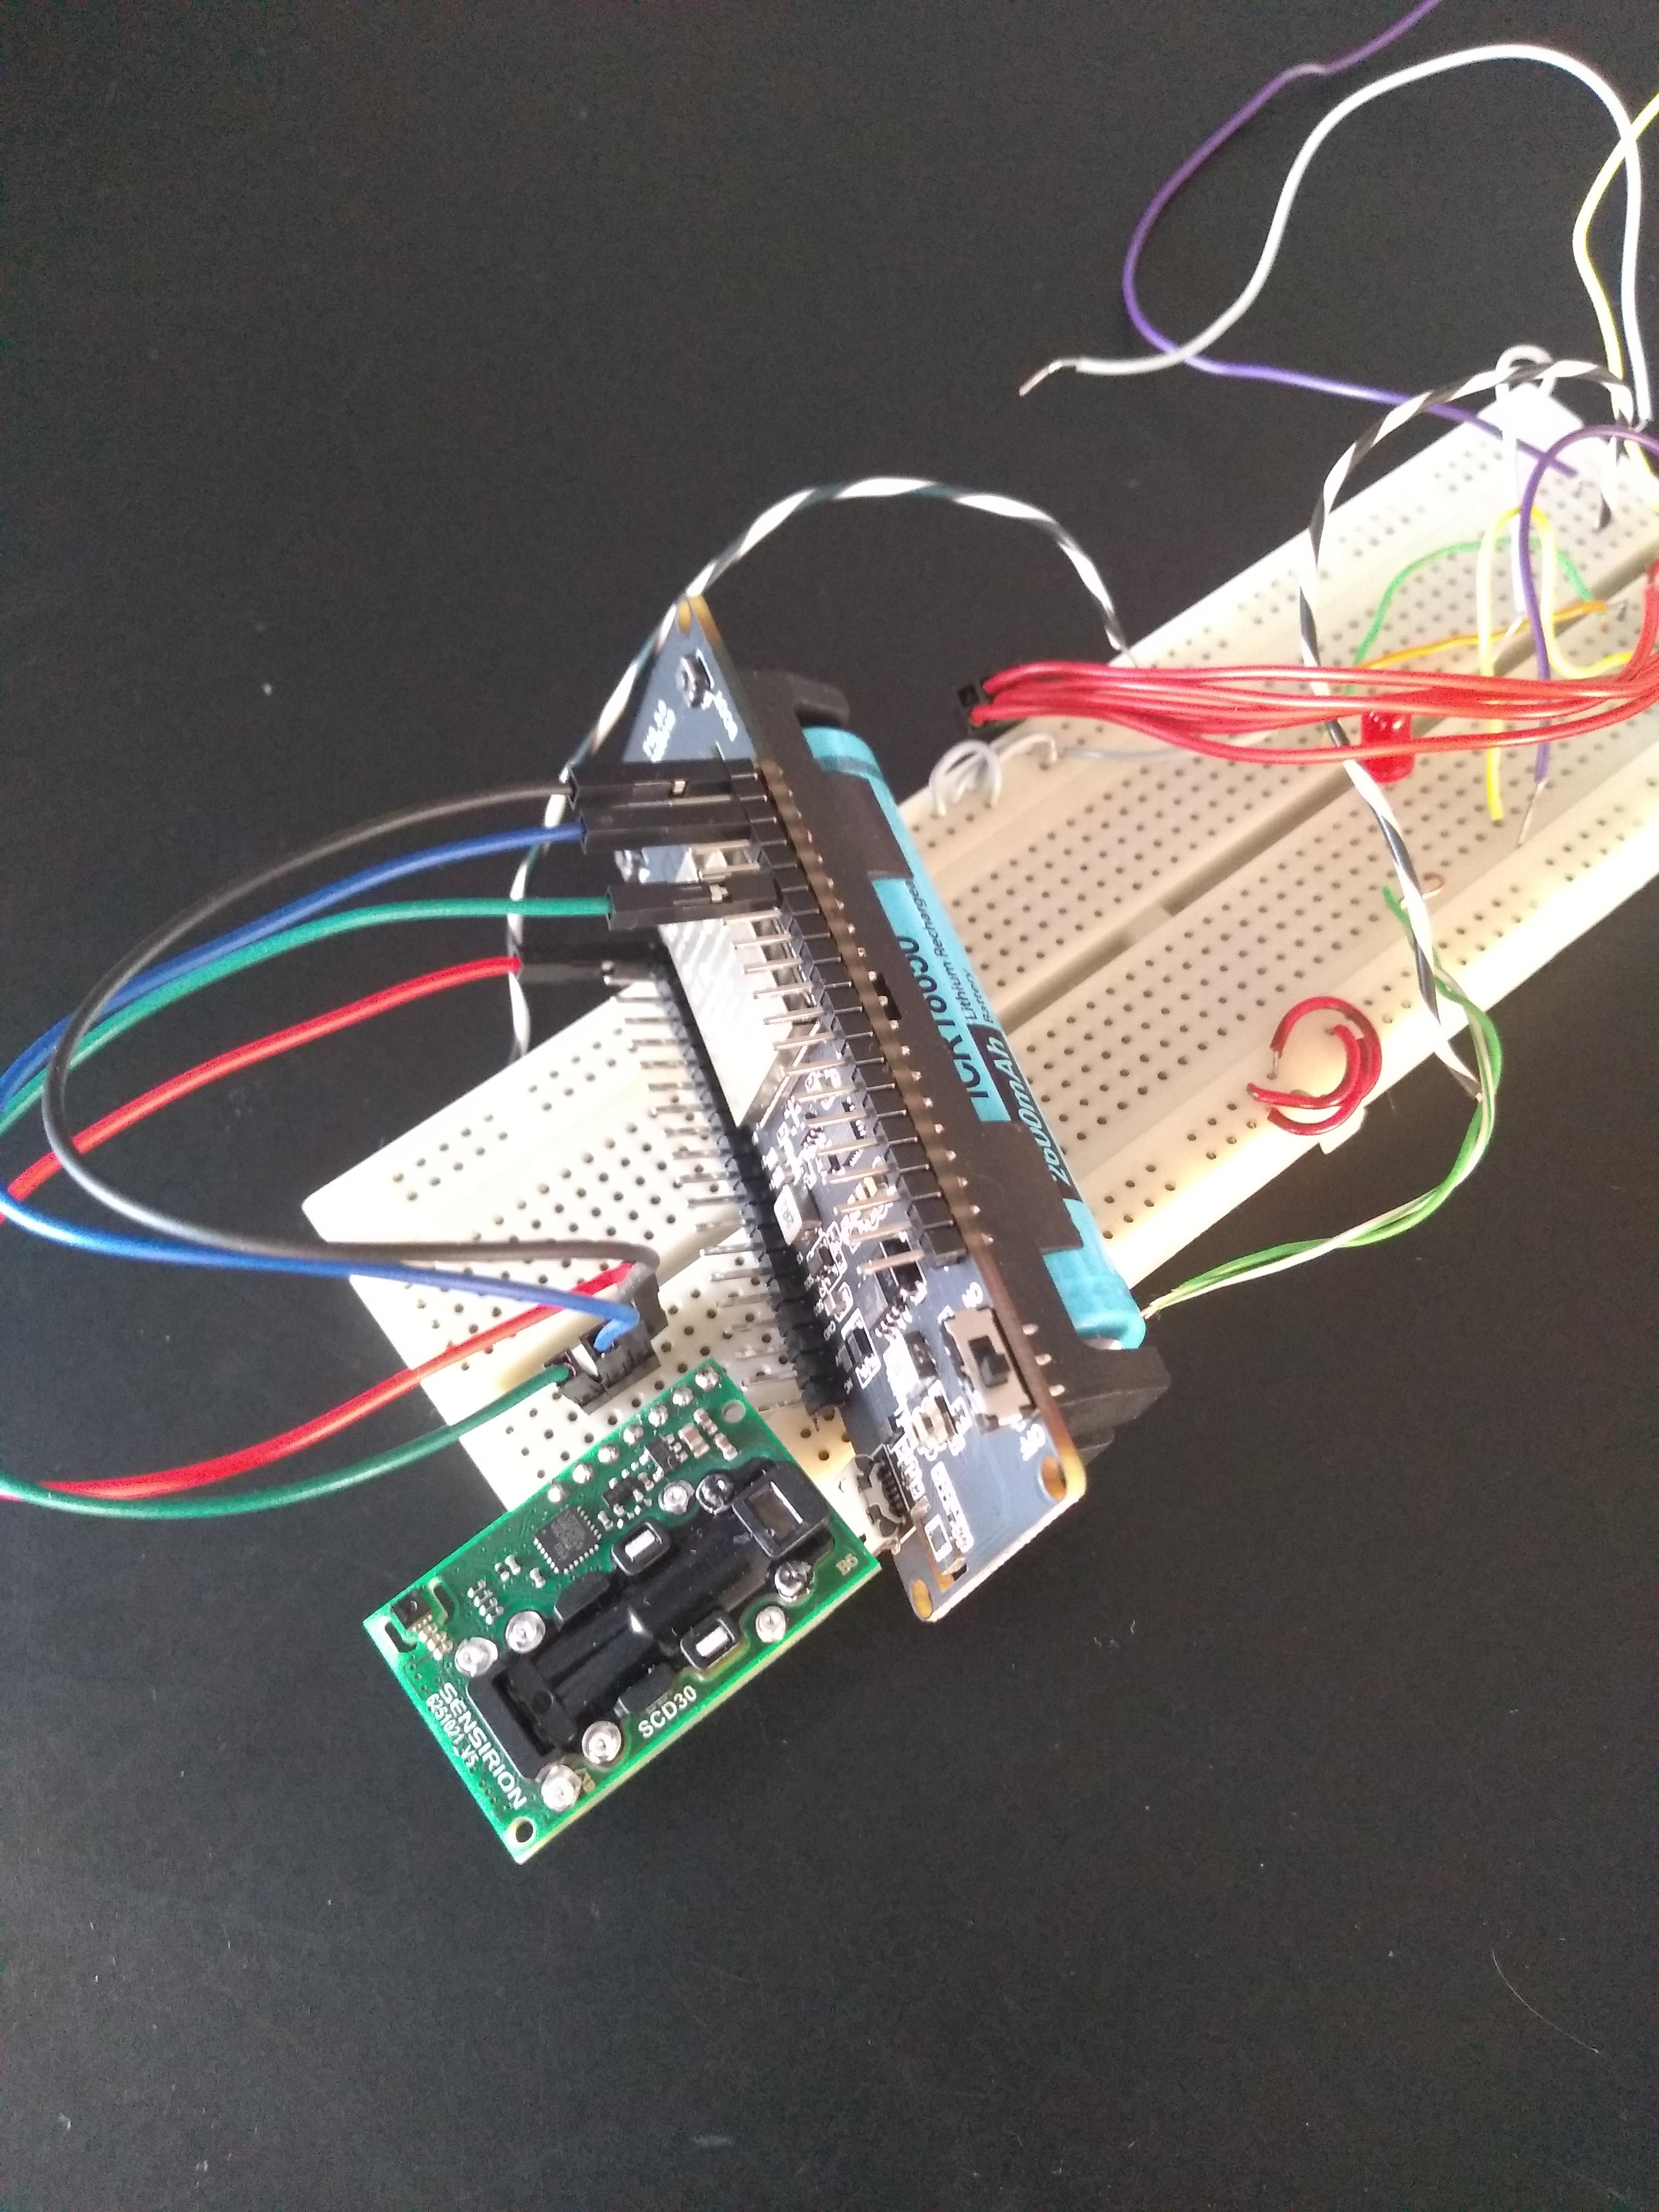
Here is how I got it wired up:
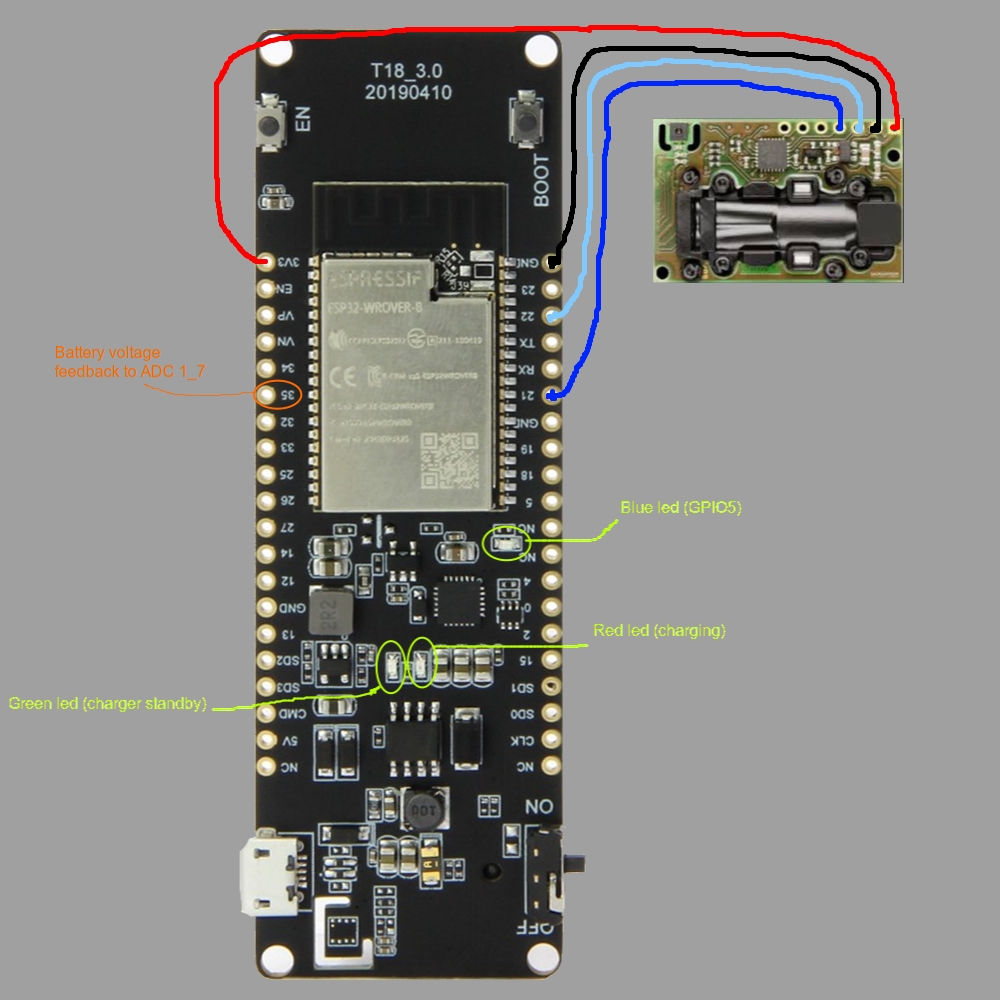
There is nothing particularly different to how I got the SCD30 wired to the ESP32 DevKit that I used earlier, the GPIOs for I2C operation are the same it’s just that they’re laid out differently. The LilyGO T-Energy also comes with a battery voltage feedback circuit routed to GPIO35 which allows to monitor the battery. This will certainly come in very handy during my little experiment.
At this point I’ve only slightly adjusted the configuration so that we support the battery voltage monitoring, and I’ve also added extra status feedback functionality to the blue “user” LED at GPIO5. Since the T-Energy board doesn’t have a power LED (remember it’s focussed on low power usage, you don’t want a LED to drain your batteries) I thought this may come in handy as a visual feedback in cases something goes wrong.
esphome:
  name: wireless-air-quality-sensor
  platform: ESP32
  board: esp-wrover-kit

# Enable logging
logger:

# Enable Home Assistant API
api:

ota:
  password: "******************************"

wifi:
  ssid: "telenet-5A11733"
  password: "*******"

  # Enable fallback hotspot (captive portal) in case wifi connection fails
  ap:
    ssid: "Wireless-Air-Quality-Sensor"
    password: "************"

captive_portal:


status_led:
  pin: GPIO5
  id: blue_led


i2c:
  sda: 21
  scl: 22
  scan: True
  id: bus_a


sensor:
  # battery
  - platform: adc
    pin: GPIO35
    name: "Wireless CO2 sensor battery voltage"
    update_interval: 60s
    attenuation: 11db
    filters:
      - multiply: 1.73

  # CO2 sensor
  - platform: scd30
    co2:
      name: "Slaapkamer CO2"
      accuracy_decimals: 1
    temperature:
      name: "Slaapkamer Temperature"
      accuracy_decimals: 2
    humidity:
      name: "Slaapkamer Humidity"
      accuracy_decimals: 1
    address: 0x61
    i2c_id: bus_a
    update_interval: 120s
    temperature_offset: 1.5 °C
I’m not naïve to believe the result will end up to be a good solution. Both SCD30 sensor and ESP32 with all power circuitry are fully alive and draining the battery with 10s of milliamps continuously. But it’s a starting point from we can improve.The test I’ve performed involves fully charging a PKCELL 3.7V ICR18650 2600mAh lithium battery and then disconnecting the mains power so that the T-Energy boards runs entirely on its own power source. Now we leave the device running until it runs out of battery power. Here are the test results:
- Battery voltage @ start: 4.12V
- Battery voltage @ end: 2.64V
- Discharge time: 42 hours 25 minutes
As expected the battery is drained pretty quickly: we’re running out of juice in less than 2 days! Because I’ve added the battery monitoring sensor I noticed the device kept running until the battery reached 2.64V. Many people may consider this as harmful and it is suggested to protect the battery from not discharging it that much. When examining the discharge curve from the image below we can conclude that there is indeed a tipping point around 3.2V, and if you cross that point by draining more energy the battery very quickly goes from “okay to work with” to “flat out dead”. As it seems to me there isn’t much use in allowing the battery to go below that 3.2V level, you certainly don’t want to risk damaging the battery for that few minutes of extra lifetime.

One other thing we can conclude here is the average power consumption of our device. I haven’t used a real measuring device, so it’s actually an estimation based upon the battery’s capacity and the time it took us to use all of that. Basically we used the 2600mAh capacity in a period of over 42 hours, so we divide the 2600 by 42,5 and get the current that is drawn continuously:
- Estimated average power consumption: ~61mA
While estimations are never correct, this test easily shows us that the device isn’t performing well on batteries. As I expected earlier, keeping the entire device alive draws far too much energy for battery powered solutions. Some tweaking is required to reduce those figures.
Lowering the power drain for better battery operation
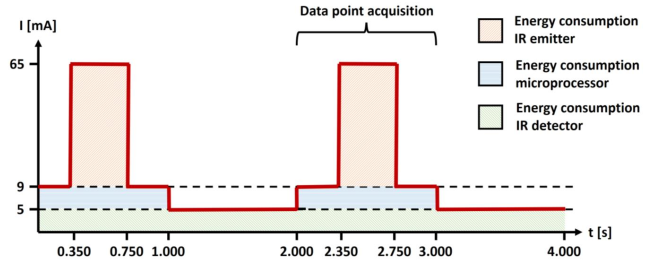
The Sensirion SCD30 is made out of 3 main components. A microprocessor, an IR emitter, and an IR detector. This is particularly interesting since all components need to be taken into account when looking for lowering the total power usage. Sensirion states that when the sensor is running in continuous mode, the sampling rate will make a big impact on the power consumption. During sampling all 3 main components need to be powered and hence the power usage will be high. However, in between collecting samples the IR emitter and microprocessor are not used and will not draw any current.
Given that, highering the sampling rate will increase the total power consumption, and lowering the sampling rate will reduce that. So to obtain better battery performance the quickest solution on the sensor’s side is to decrease the sample rate.
However, in effect the response time also changes: higher samples rates reduce the response time. But why is that response time so important? The response time describes how a sudden change in CO2 level is reflected in the sensor readout value. For example, when a CO2 level change from 4000 to 6000 ppm occurs you’ll be able to read that value within 40 seconds when using a 2-5 second sampling rate. When you increase the sample rate to 60 seconds you may have to wait several minutes before the sensor will reflect that actual CO2 level. You could see it as sensing latency. Here is a chart covering how both need to be taken into account when defining the sampling rate:
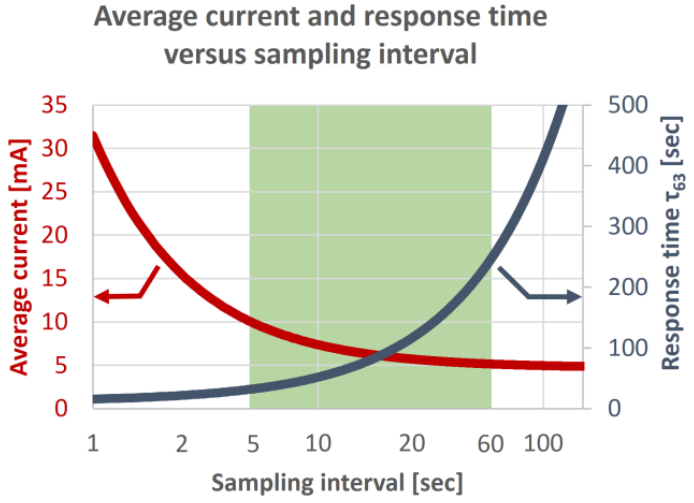
One important thing to note here is that setting the sample rate to larger than 15 seconds will not make a big impact on average power consumption due to parts of the sensor still being powered. The minimal current draw is 5mA, which is not very great compared to the various sleep modes that can be achieved with various other sensors and microcontrollers. If you’re satisfied with an average power consumption of 5-10mA you may want to use the SCD30’s RDY pin to wake up your main application processor whenever data is ready for readout. The RDY is active low which means that when data is ready the voltage on the pin measures 0V. Compared to the estimated power usage we saw in our battery test earlier this may result in a considerable increase in battery lifetime. I’ve been experimenting with this but I found that the end result using ESPHome firmware wasn’t working out that smoothly since the RDY pin wasn’t behaving as expected.
UPDATE: later I found out that the ESPHome firmware wasn’t using the SCD30’s dataready register and “set measurement interval” command to retrieve data. Instead ESPHome used a software timer which accidently may or often may not run in sync with the SCD30’s measurement interval. When both timers are out of sync the RDY pin toggles on and off at unpredictable rate and the pin behavior becomes unusable for our purpose. I’ve made a pull request to assure that ESPHome is no longer relying on its internal timer but instead using the SCD30’s measurement interval alone, let’s hope it gets merged… UPDATE: the pull request was merged in the development branch and will soon be part of ESPHOME. With that modified firmware I’ve now repeated the above battery test. I’ve also setup the ESPHome deep sleep component which puts the ESP32 in sleep soon after a SCD30 sample has been collected. The ESP32 awakens automatically after 108s using a wakeup timer which gives it enough time to setup its connection to HomeAssistant (through Wifi) before the next sample (with 120s interval) is about to be collected. Here is the part of the configuration that I’ve changed:
sensor:
  # battery
  - platform: adc
    pin: GPIO35
    name: "Wireless CO2 sensor battery voltage"
    update_interval: 60s
    attenuation: 11db
    filters:
      - multiply: 1.73

  # CO2 sensor
  - platform: scd30
    co2:
      name: "Slaapkamer CO2"
      accuracy_decimals: 1
      on_value:
        then:
          - if:
              condition:
                api.connected
              then:
                - delay: 2s
                - deep_sleep.enter: deep_sleep_esp32
    temperature:
      name: "Slaapkamer Temperature"
      accuracy_decimals: 2
    humidity:
      name: "Slaapkamer Humidity"
      accuracy_decimals: 1
    address: 0x61
    i2c_id: bus_a
    update_interval: 120s
    temperature_offset: 1.5 °C

# power saving mode
deep_sleep:
  id: deep_sleep_esp32
  run_duration: 5min
  sleep_duration: 108s
  wakeup_pin:
    number: GPIO32
    inverted: true
Here are the test results:
- Battery voltage @ start: 4.10V
- Battery voltage @ end: 2.67V
- Discharge time: 138 hours
With the ESP32 in sleep most of the time and SCD30 now literally sampling far less than our previous setup we now see a big improvement in battery lifetime. The discharge time improved at least 3 times. The estimated average power consumption of our device is therefore greatly reduced:
- Estimated average power consumption: ~19mA
This is still far from acceptable for battery powered solution and I feel there is still some headroom for further improvements. For example it doesn’t take very long to get connected over Wifi to HomeAssistant, the 12s margin I used was choosen to leave some headroom for those occasions where connecting is a bit slower. Furthermore I also found out that the SCD30’s internal timing is not very accurate and may wakeup the SCD30 multiple seconds later than expected. In effect the ESPHome is alive for far too long. So taking some lesser margins may turn out well for you, but also further increasing the measurement interval may have a positive impact on battery life.
As an alternative way to reduce power consumption even further I’ve been thinking of switching the power of the SCD30 totally. If you leave it in continuous operation (as advised) the sensor should automatically restart sampling using its configured sampling interval as soon as the power is re-applied. One side effect of cutting the power is that auto re-calibration (ARC) can’t be used anymore, so the ESPHome firmware will need to somehow handle that. And other thing that needs to be taken into account is that the sensor takes 1-2 minutes to stabilize its readings. The latter is the biggest show-stopper of all since it requires to keep the sensor powered for a considerable large amount of time. Say you’re set to collect CO2 levels each 3 minutes in Home Assistant, then power cycling the sensor will require you to wait for 2 minutes before the sensor values reach acceptable quality. This leaves us 1 minute that the sensor can be completely switched off. So the average power drawn during these 3 minutes is 2 x 6.5mA / 3 = 4.3mA. In effect you can reduce the power consumption only by a small part (compared to your sleeping ESP32) while you’d be needing to setup various automations to get it working. You can sleep even more, however know that the longer it takes for values to reach HomeAssistant, the longer it takes for automations to be triggered when the CO2 level reaches critical values. What we really should be doing is keeping the sensor and ESP32 sleeping for most of the time. In our case we would want to have them only active for 5-10 seconds at most. Doing that the average power consumption (for the SCD30) could be further reduced to (6,5ma / 6) / 3 = 0.361mA which is roughly 20x better than keeping the sensor powered all the time. Note that this is highly hypothetical, for now I haven’t found a solution to reach those values using ESPHome.
While Sensirion recommends waiting 1 to 2 minutes before using sensor data, I was curious how bad the results could be. So I setup a little experiment where I put the CO2 sensor in an isolated environment with the ESP32 hooked up to it. Then I power cycled the device and watched how the CO2 values changed over time while they actually shouldn’t.

The ESPHome firmware retrieves the sensor data and hands it over to my HomeAssistant setup. In HA I can then easily read the data and plot it using my office suite of choice. Below is a chart of that the sensor data. It includes the CO2 level in parts per million, and the temperature in degrees Celcius.

From this chart you can easily spot that the first value coming from the sensor is not very accurate. The second sample that we collected 6s after boot is far closer to the final value, but still not very accurate. But from there on things are getting more trustworthy. After 15 seconds we’re getting near, if you can live with some deviation this could be your sweat spot. If you want a little more accuracy you should be waiting a little longer: after 45 seconds the sample values are more or less stabilized. However, if you really want to go by the book: 1-2 minutes will provide the most accurate data. Also notice how the temperature is slightly increasing throughout the measurements. This could be due to internal heating of the sensor, but it could also be measuring the heat dissipated by the ESP32 that’s sitting close to it. In the end the temperature and humidity (not shown in the above chart) data is very trustworthy right from the beginning when the sensor gets powered.
With all that in mind, if you settle for a 15 seconds wakeup interval (and SCD30 sampling at 2s) combined with some smart ESPHome automations you could maybe be looking at an average power consumption of around 0.5mA or more (roughly guessed). That’s not particularly low and far from power efficient. If you would power it from a single rechargeable 3.7V lithium cell with a capacity of 2600mAh, we’d be able to run it for 5200 hours, which is about 216 days. That’s not taking into account any other losses caused by ESP32, power regulators, etc. Wild guess: basically you’d be recharging each 6 months… You may want to add some extra circuitry (or use a LilyGO T-Energy) to measure the battery voltage so that you can also monitor that part of your device, and have some automations setup that send an alert when battery voltage drops too low. Note again that all of this is highly hypothetical, and not exactly where the SCD30 is designed for.
Conclusive thoughts
The Sensirion SCD30 is a great sensor for measuring CO2 levels and integrating it in your Home Asssistant setup. It comes at a relative high price compared to some of the cheaper (but not true) CO2 sensors out there, but in return you get absolutely good quality and good support. I can highly recommend the sensor. If you’re looking for a battery powered solution the SCD30 may not be your preferred partner. It consumes a decent amount of power even when you’re following the design rules. Through some smart hacking you may be able to squeeze out better battery performance which may even last more than 1 month on a single charge, but don’t expect to run it throughout the year unless you’re packing it with a big sized battery pack or solar cells.