Another few months go by, another thing gets broken. From all cars I’ve owned there has been none so troublesome as the Vectra-C, this time a swirl valve problem appeared. But first, how I came to diagnose this failure…
Some time ago I noticed that going high on revs and then setting the car in neutral gave me intake air leak fault messages. They disappeared again by their own after some minutes driving. Some time later this behavior no longer happened, but introducing new troubles: performance loss and lots of black smoke when tapping the gas. The performance loss could best be described as when you step down the gas pedal, the car would unevenly produce power, then hold back, then produce power again, then hold back again, etc…. and all this in the single event of going from 1500rpm tp 3500rpm. By opening the hood my eyes more or less by accident fell on the swirl valves control bar just laying loose, uncoupled from the swirl valves. Aha!
As I mentioned before, the intake manifold comes with swirl valves which allows to have more swirl in the intake air whenever there is a low amount of air entering the engine. Adding more swirl adds to improve burning the fuel and to lower the emissions. Whenever the engine load goes upwards there is however a higher need of air and then you want as much air inside the engine as needed. In this case there is no longer a need to add more swirl. Now take a look at how this effect is accomplished inside the Vectra-C intake manifold:
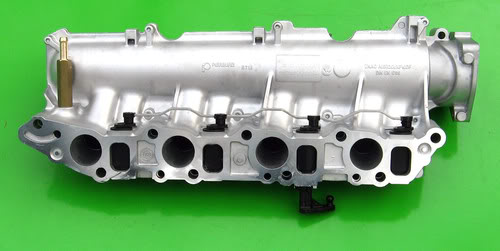
On the far right side intake air enters the intake manifold. This air is a combination of compressed air coming from the turbo and exhaust gas re-entering the engine through the EGR system. Both streams of air get mixed inside the intake manifold and is next distributed to each engine cylinder. On the picture above you may notice 8 instead of 4 exhaust holes, and this because we have 2 exhaust holes per cylinder. One of them describes a direct path to the engine cylinder, the other one a more indirect path which makes sure a certain amount of swirl is added to the intake air. The swirl valves are placed inside the more direct pathway and will either block air (when more swirled is needed at low engine load) or allow air to travel through (when a high airflow is needed at high engine load). Also seen in the picture is how each valve is connected to each other by a control bar, so moving only one valve will move all 4. Valve 3 starting from left (when you stand in front of the car facing the engine) is the one which actually is controlled by an actuator. The actuator on its turn is controlled by the ECU. A lot of good information can also be found here
As I said earlier, the control bar on my car had come loose, the ball joints had worn out. There was also a lot of carbon around some of the valve ball joints indicating that some carbon from the EGR system has also build up against the swirl valves.

I checked the functioning of each valve by moving the ball joints with a screwdriver and there seem to be no issue with them. However, because I’m already at 230k+ km I wanted to have a look inside the manifold to check its state. Is there not too much carbon build up against the valves causing the valves to malfunction and trowing errors codes like the one I saw earlier? So I began working my way down to the point where I could eventually remove the intake manifold. However…! There is so much stuff placed around the intake manifold that you have to remove first: oil seperator, EGR valve, common rail, coolant pipes (yes you have to drain the engine coolant), vacuum lines, air hoses, vacuum box, fuel pump, … And is far as I could see, you also have to remove the toothed belt. That’s not really a trivial task if you ask me. Because I didn’t want to do anything wrong with removing the toothed belt I aborted the plan of removing the intake manifold. The toothed belt needs a replacement anyway in some months from now and so there is still a chance to replace the intake manifold. For now I replaced everything and just glued the ball joints to the control bar and so far it seem to function as expected:
Fingers crossed for how long it holds… Notice (I found it afterwards) that there is also a good description from Opel/Vauxhall TIS that leads you through the entire process of replacing the intake manifold: here.

When you say you glued the bar back to the ball joints, how did you do this? I have the same problem, even bought the “upgraded” bar with the brass joints instead of plastic, and it still falls off. Any help would be much appreciated!
I have this exact same problem, except now it spit the entire valve out, they must be a design fault, I take it apart put new ones in and a new bar lasts 6 months then the dreaded squeeking at 1500 revs, oil on one valve, replace it starts again a couple of weeks later, today it’s completely spat the valve out, pushed it back in to get home and pop again, my advice to anyone with this engine is either get rid of it or keep a spare set and a spare inlet and be prepared to loose a few Saturdays fixing the dam thing
Hello Peter, tell me what did you do about the valves! You buy a new Kit for 552210201 at amazon with a bar and the plastic valves? I want to do it “again”, because years ago i had the problem with the original inlet, and the second is going to fail again with some oil on.